
Serge Borisov
Head of Growth at CRMChat
Transform your unorganized Telegram leads into a clean, actionable sales machine.
Organizing Your Sales Pipeline with Custom Stages and Smart Filters in CRMChat.ai
A sales pipeline full of unorganized leads can be just as ineffective as an empty one. CRMChat.ai allows you to transform your raw lead database into an actionable sales machine by creating custom pipeline stages and using smart filters to segment your prospects. This helps you quickly identify high-priority deals and focus your efforts where they matter most.
Customizing Your Pipeline Stages
By default, your pipeline includes five stages: Lead, Conversation, Proposal, Negotiation, and Won. You can customize these stages to perfectly match your unique sales process. First, ensure you are in the Pipeline view, which you can select from the dropdown menu at the top of your leads list.
To edit, add, or remove stages, you'll need to navigate to the custom properties settings. Here's how:
Click the Settings icon (gear symbol) in the top-right corner of the CRMChat.ai window.
Select Custom properties from the settings menu.
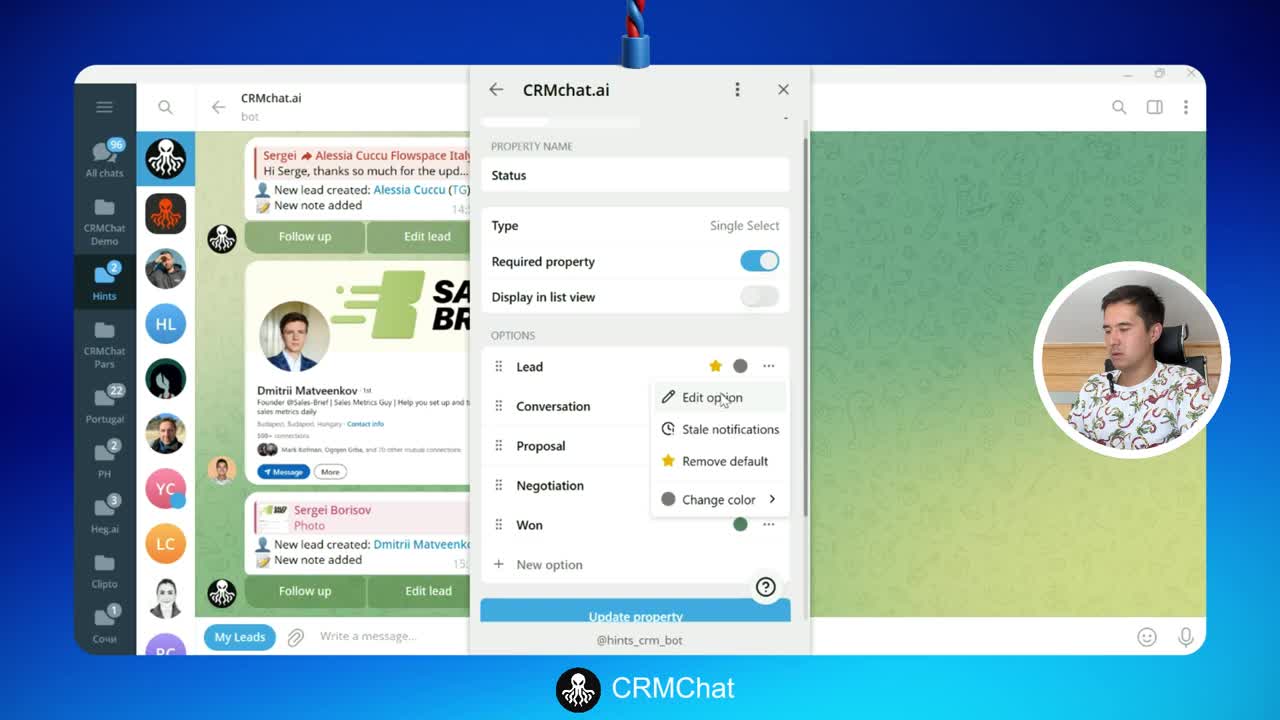
Click on Status. This property controls your pipeline stages.

From this screen, you can edit the name of any existing stage. For example, you can change the default 'Lead' stage to 'New' by clicking the three-dot menu next to the stage name, selecting Edit option, and typing the new name.
Creating and Applying Smart Filters
Smart filters help you segment your leads based on specific criteria, such as deal size, product interest, or lead source. To create a new filter, you first need to create a custom property for it. This allows you to categorize leads in a way that is meaningful to your business.
In the Custom Properties menu, click + New property.
Choose a property type. For categorizing leads, Single Select is a great option.
Enter a Property Name, such as 'Product' or 'Deal Size'.
Add your options under the OPTIONS section (e.g., '$10', '$100', '$1000').
Toggle on Display in list view to see this property's value directly in your pipeline without having to click into each lead.
Click Create property to save.

Once created, you can assign a value for this property to each lead. After your leads are categorized, you can filter your pipeline view:
Click the + Add Filter button at the top of your pipeline.
Select the custom property you created (e.g., 'Product').
Choose the value you want to filter by. Your pipeline will instantly update to show only the leads that match that criterion.

Tips for Using Custom Properties
Keep it simple: Avoid creating too many pipeline stages. A clean, simple process is easier for your team to follow.
Use filters for focus: Create saved views with filters for different priorities, such as 'High-Value Leads' or 'Follow-up Today', to quickly switch between focused lists.
Be consistent: Ensure your entire team understands the criteria for each custom property and pipeline stage to maintain clean and reliable data.
In summary, custom pipeline stages and smart filters are powerful tools for bringing order to your sales process. By tailoring the system to your workflow, you can ensure your team is always focused on the right leads at the right time, ultimately helping you close more deals.